

In pursuit of geekdom and because now I have acquired the metalworking skills to do whatever I want however I want and still get class credit for it, my project this semester is a little metal book of various quotes arranged to tell a story, combined with saw-pierced and soldered images. And yes, while it would be amazingly badass to recreate the above image in faithful entirety, I have been forced to settle for merely fabricating Link's 8-bit sword and putting the quote on the page.
This time around I took some pictures to document my journey from sheet metal to more-or-less end product. Join me, if you will, in Alz's Saga of Varying Regret.
Step(s) the First-ish: Draw out Link's sword, photocopy image & cut out, rubber cement photocopy onto cleaned & polished 20 gauge copper sheet which is in turn rubber cemented to cleaned & polished 20 gauge bronze sheet, then tape the two metals together for extra security. String up size 5/0 saw blade (that's a teeny tiny fine saw blade that practically looks like a hair, you can see a few broken ones on the image below 'cause yeah, they snap easily), wax saw blade to lubricate, then proceed to saw out sword.
 |
| Success! I think I only broke 2 saw blades on this sucker. |
 |
| If you look closely, the sword looks like a layer cake, copper on top and bronze on the bottom. |
Step the Second: Saw the sword into little pieces because Alz thought it would be a cool idea to go for accuracy and represent the fact that Link's sword in fact has little stripes on the hilt if you bother to magnify the 8-bit thing by 10x. I lost a couple of the bits on the floor while sawing and had to use a broom to sweep up piles of dust so I could search through them but yes, I eventually found everything.
In order to keep track of them, I numbered pieces of masking tape and stuck the component bits onto them, as pictured below. The handguard and blade were easier to keep track of because they were bigger and the rubber cement held them together better until I was ready to peel them apart.
Curse crooked sword. Try to bend it straighter with pliers, knowing all the while this is a bad idea, and break the bits off. Weep tears of blood in the knowledge that I Knew Better Than to Do That. Reposition bits straighter, re-flux and re-solder, pickle clean, and this time clamp sword into a vise and use a file to straighten edges and clean things up. Congratulate self that you would've had to break it apart anyway to get it straighter.
Step the Fifth: Cut 24 gauge copper into appropriately-sized pages. Use a scraper to clean the copper (since copper gets dirty/oxidizes very quickly), then sand it to smooth out scrapes and clean & polish further. Flux page, flux sword, put solder chips on back of sword, place sword on page, then torch using a strong bushy flame. Heat evenly all around, then concentrate flame on sword and pray that the solder flows all the way around. Soldering one flat surface to another in this manner is called sweat soldering since capillary action forces the sandwiched solder to flow between the metal sheets.
Quench piece (SSSSSSSSSSIZZLE) and pray that everything flowed.
It did. Sword is solidly on there with a faint silver outline all around, showing the solder flowed completely.
VICTORY SHUFFLE.
Step the Sixth: Scrub residual flux off piece with toothbrush, soapy water, and a little baking soda. (Normally the pickle takes care of that but like I said above, I wanted to keep the current color.)
Then it's time to masking tape the hell out of the background to protect that precious color while I polish the sword with sandpaper to regain the shiny and the yellow bronze color (bronze turns coppery when you heat it too much and also gets copper-plated if thrown into the pickle).
Commence sanding, working from coarse to fine with 320 grit sandpaper, then 400, then 600 (this is a typical polished finish), and then hit it up with some 1000 for good measure (just that extra bit of polish).
Step the Seventh: Remove tape. Drill holes for spiral-binding in the future. Debate whether to do cut-out spaces for paper quotes inserted between riveted pages, or go with stamping. Fail to come to a decision and realize that there's no blog post in the works for tonight, so take a new picture of nearly-finished work, throw together post, and decide to decide what to do tomorrow.
And there you have it! The whole of this took I don't know how long, hours to do, but I can't say exactly how long since I was doing other things at the same time. But yes. It looks pretty simple when it's all together like this, but as you can see it is a lengthy process involving much cursing and rage against the universe and 20/20 hindsight. All in all, though, this page was actually one of the easier ones I've done so far.
Hopefully I'll get this project done within the required timeframe. Hopefully it will be awesome. Hopefully I won't have to cut too many corners--or pages. I already axed three pages in the interest of time and reasonableness and manageability and non-fun things like that, and may axe an additional two. We'll see.
Q4U: How often is it that you're in the middle of doing something complicated and realize midway through that zomg, WHY AM I DOING THIS THE HARD WAY, only now you're committed to it and can't back out and have to finish what you've started the way you started it? Or do you restart from scratch and do it the easier way?
 |
| Yes, that is a dalek on the paper. |
Step the Third: These steps aren't really separate steps, they're just a whole lot of steps crammed into a single step because I don't have pictures of boring things and/or was busy and couldn't take pictures/forgot. Anyway, next thing I did was arrange try to arrange all the bits to form the sword--wherein I ran into a problem. The little hilt bits got flipped every which way so I had to use tweezers to turn them and flip them and nudge them and try to fit them back together aaaaand yeah, on one sword the fit was pretty good and on the other the results were...crooked.
 |
| Hurrah! Success! Straightness! |
 |
| ...WTF. |
In the photos above, the pasty coloring is from flux, which is painted onto the metal to keep it clean and prevent it from oxidizing while it's heated with the torch, and the little silvery chips are solder. Note that the copper-bladed sword is the one I intended to use for this project since Link's sword is brown; the bronze one is just for kicks and because hey, I have the inverse parts and might as well. Naturally the one I really wanted is the one that turns out to have a Gothic S-curve going for it. Sigh.
Step the Fourth: Time to solder. Heat those suckers (gently) with the torch to dry out the flux and prevent the solder from jumping around, then turn up the flame and heat until the solder flows. It's a liquid silver flash and bam! Done. Hopefully.
Quench hot metal (sizzzzzzzzle) and dump in pickle, which is the term for a sulfuric acid bath that removes the flux and oxidzation and cleans the metal.
 |
| Fresh out of the pickle. Crooked sword is still crooked. ): Ideally there wouldn't be those big silvery spots of solder visible. If they were on the front of the piece I would have cleaned them up but since this is the back and I'm soldering them to a metal page, it's okay. |
Curse crooked sword. Try to bend it straighter with pliers, knowing all the while this is a bad idea, and break the bits off. Weep tears of blood in the knowledge that I Knew Better Than to Do That. Reposition bits straighter, re-flux and re-solder, pickle clean, and this time clamp sword into a vise and use a file to straighten edges and clean things up. Congratulate self that you would've had to break it apart anyway to get it straighter.
 |
| With a dime for size reference. Straightening that hilt sucked but at least it's not too bad now. I also polished the front a bit to see how it looked. |
Step the Fifth: Cut 24 gauge copper into appropriately-sized pages. Use a scraper to clean the copper (since copper gets dirty/oxidizes very quickly), then sand it to smooth out scrapes and clean & polish further. Flux page, flux sword, put solder chips on back of sword, place sword on page, then torch using a strong bushy flame. Heat evenly all around, then concentrate flame on sword and pray that the solder flows all the way around. Soldering one flat surface to another in this manner is called sweat soldering since capillary action forces the sandwiched solder to flow between the metal sheets.
Quench piece (SSSSSSSSSSIZZLE) and pray that everything flowed.
It did. Sword is solidly on there with a faint silver outline all around, showing the solder flowed completely.
VICTORY SHUFFLE.
 |
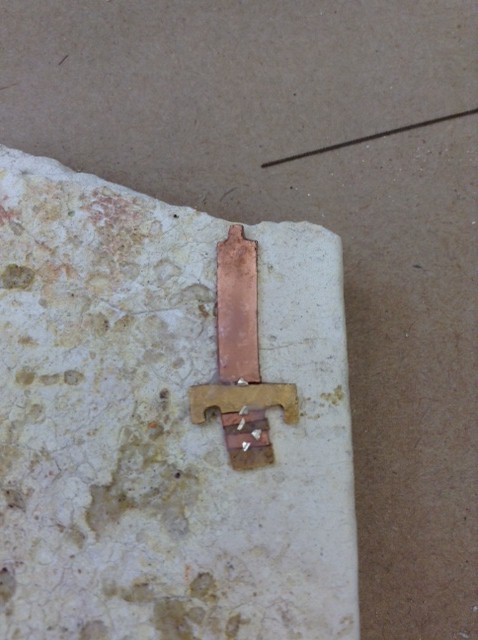
| In this case, I didn't put it back into the pickle because I liked the coloring I got from torching and quenching. The pickle would remove all that and leave it uniformly coppery. The flame-y aureole around the sword is where I painted the flux. |
Step the Sixth: Scrub residual flux off piece with toothbrush, soapy water, and a little baking soda. (Normally the pickle takes care of that but like I said above, I wanted to keep the current color.)
Then it's time to masking tape the hell out of the background to protect that precious color while I polish the sword with sandpaper to regain the shiny and the yellow bronze color (bronze turns coppery when you heat it too much and also gets copper-plated if thrown into the pickle).
 |
| Since working with metal, I've come to truly fundamentally bone-deeply understand what purpose masking tape serves in life. Also, I now comprehend why it is called masking tape. |
Commence sanding, working from coarse to fine with 320 grit sandpaper, then 400, then 600 (this is a typical polished finish), and then hit it up with some 1000 for good measure (just that extra bit of polish).
 |
| It's shiny now! And look how dirty the surrounding tape is. |
 |
| The holes are on the right side because the pages are going to be riveted together, i.e. p. 1&2, 3&4, etc. |
Hopefully I'll get this project done within the required timeframe. Hopefully it will be awesome. Hopefully I won't have to cut too many corners--or pages. I already axed three pages in the interest of time and reasonableness and manageability and non-fun things like that, and may axe an additional two. We'll see.
Q4U: How often is it that you're in the middle of doing something complicated and realize midway through that zomg, WHY AM I DOING THIS THE HARD WAY, only now you're committed to it and can't back out and have to finish what you've started the way you started it? Or do you restart from scratch and do it the easier way?


7 comments:
Wow! It's gorgeous!!
Oh my goodness, this is really neat!
Holy WTF. I can't believe you're soldering! And metalsmithing! Gonna call you Alice Smyth now.
That's really cool! I love the design.
(Hope I'm not commenting twice--first time I tried the computer froze.)
You are a metal working baddie - in a good way. Woot!
Ahhh this is so awesome! How do you always do such cool things, Alz? The whole time I was reading about the process I was like O.O HOLY **** THAT'S CRAZY.
Also I would probably redo from scratch if I figured out there's an easier way. While I'm lazy, I also have these erratic bouts of perfectionism. Plus, if it saves work in the future, then that's more lazy points for me! :)
Just one word: WOW!
I think you did great and maybe it wouldn't have looked so good if you took the easy way. :)
~Akoss
Post a Comment